
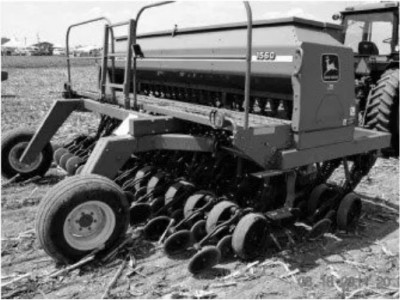
Grain Drill Calibration
By R. Hoover & S. Duiker: Penn State Extension
** For video instructions, click here
The seed delivery system in drills is not as precise as that used in planters because they use flutes or sponges to meter seed instead of seed singulation.
However, drills are cost effective for establishment of close-spaced crops and are capable of placing seed at a uniform depth, provided depth-control or furrow-closing wheels are properly adjusted and maintained.
Seed charts provided by drill manufacturers give a good starting point for obtaining the desired seeding rate, but they may not be very accurate. Variables that can affect seeding rates include differences in seed size and shape among crop varieties (and sometimes seed lots), seed coatings or seed treatments, and seed density (bushel weight). From time to time, new species or mixtures of two or more species that are not listed on the drill seeding chart will be planted. For these reasons, a producer needs to know how to calibrate a drill. This fact sheet gives easy steps to calibrate your drill. Additionally, it is useful to check actual seeding rates by maintaining records of seed used and acres drilled over the years.
Drill Calibration- Determine the area "seeded" when driving the calibration distance.
Calibrate the drill for a driving distance of 200 feet. This is an arbitrary length, but it is long enough to capture variability in the field yet not too long to be impractical. Next, determine the width seeded by your drill. In this example we will use a drill with a working width of 10 feet. Working width is calculated by multiplying the spacing between seed openers by the number of openers on the drill. The area seeded in our example will be 2,000 square feet (200 feet long by 10 feet wide). To calculate the fraction of an acre, divide 2,000 square feet by 43,560 square feet per acre to arrive at an area of 0.046 acre.
- Determine the number of revolutions of the grain drill drive wheel when traveling the calibration distance.
In the field use a measuring tape or other measuring device to measure a course that is 200 feet in length. Determine which wheel is responsible for driving the seeding mechanism on the drill. On some drills this is a special wheel that only runs the seed metering mechanism, while on other drills it is one of the wheels that supports the drill. You need to determine how many revolutions this wheel makes in the field in a 200-foot length. Make a mark or apply a piece of heavy tape to the wheel to enable you to easily count wheel revolutions while driving. Drive 200 feet, which you previously marked out in the field, and count the number of revolutions made during the 200 feet. For increased accuracy, repeat this one or two times and use the average.
- Set up the drill for calibration.
Stationary calibration is accomplished by simulating drill operation. The seed delivery system of the drill is operated much in the same way as it is when being pulled across the field--by turning the drive wheel the number of turns determined in step 2 above. Stationary calibration is done by lifting the drive wheel above the soil surface so it can freely spin. Some type of hydraulic shop jack is often used to accomplish this. Keep the drill securely attached to the tractor to maintain a level of safety when elevating the drive wheel and to operate the hydraulics on the drill. It is often necessary to lower the drill, permitting the drive mechanism to become engaged so that seeding rate calibration can be accomplished.
Using the rate chart supplied by the drill manufacturer (often found on the underside of the seed box lid), adjust the seed meter for the desired seeding rate of the species of interest. If your seed is not included on the chart, estimate a seeding rate by selecting a similar seed size. This will give you a first approximation. Ensure that enough seed has been added so that seed cups are full and seed metering fluted wheels or sponges are completely covered and will remain covered as seed is metered during the calibration process. Seed can be collected by one of two methods. The first involves the use of a large tarp that can be placed under all drill openers so that seed falling through the seed delivery tubes and disk openers can be collected from below the seed delivery mechanism and weighed. The alternate method involves removing the seed tubes from the disk opener assembly and placing them into several buckets or other containers used to catch and transfer all seed to one container for weighing. At this time, the drive wheel can be turned (in the correct direction) until seed begins falling from all the openers. If some openers do not drop seed, ensure that seed tubes are not kinked or obstructed (straw, spider webs). Now you are set to start collecting seed for calibration. Ensure that the drive wheel has been turned to a convenient starting point (a mark on the drive wheel with chalk, marker, or tape is suggested) and that the tarp or buckets are clean. It is best to collect seed from all openers due to the small area that is represented for this calibration.
- Calibrate the drill.
Turn the drive wheel the number of revolutions needed to represent 200 feet of travel, as determined during step 2 above. Collect all the seed from the tarp or buckets and weigh the total. Use a balance with a gram scale and convert from grams to pounds by dividing by 454 grams per pound. Calibration is a trial-and-error process. The seed is collected from the simulated seeding of a fraction of an acre, weighed, and compared to the desired seeding rate. If the rate is too low, the metering mechanism is adjusted to deliver more seed and the process is repeated. It is desirable to maintain a record of the seeding rates for each setting as one works toward the desired rate(s). Determining the seeding rate of the drill in this example is completed by dividing the total seed weight by the area "drilled" (0.046 acres). For example, 2.3 pounds collected represents a seeding rate of 50 pounds per acre (2.3/0.046 = 50). If you want to check each opener for consistency, collect seed from individual seed tubes and record the weight of the seed from each tube. Although the seed delivery system on a drill is not as precise as the seed-metering system on most corn planters, an amount collected from one opener that is 10 percent different from the average on all openers indicates a need for maintenance to the seed-metering mechanism.

A number of considerations are pertinent when determining seeding rates. A good source for seeding rate recommendations is your state's agricultural Extension office. Seeding rates are often recommended by seed suppliers for their specific species and varieties. These rates may be modified by planting date, soil type, whether drilling into tilled or no-tilled conditions, soil fertility levels, and other factors. Generally recommended rates are based on the desired plant population following emergence. Seeding rates in pounds per acre will be determined with the knowledge of how many seeds are in one pound of seed. Once this information is known, the seeding rate should be modified to account for percent germination and the amount of non-seed that is indicated on the seed label. Hard seed is defined as seed that will not germinate as quickly as the other pure seed in the bag. Hard seed is common in legumes, but seed rates usually do not need to be adjusted for hard seed. Check with your seed supplier if you have seed with more than 5 percent hard seed. When selecting seed, always review the seed labels for purity and germination. Pure live seed (PLS) is required by law to be stated on labels for all seed sold in Pennsylvania. PLS = purity x germination, or the percentage of the bulk seed weight that is viable and should germinate when planted. Keep in mind that PLS may vary among seed lots from the same supplier.
Examples of Calculating Desired Seeding Rate Based on Pure live Seed (PlS) Example 1Species: Medium red clover
PLS: 80 percent
Desired seeding rate: 10 pounds of PLS per acre
Seeding rate of bulk seed: 10/0.80 = 12.5 pounds of bulk seed per acre
Species mix: Crimson clover + annual ryegrass Crimson clover
PLS: 80 percent
Desired seeding rate in mix: 15 pounds of PLS per acre
Seeding rate of bulk seed in mix: 15/0.80 = 19 pounds of bulk seed per acre
Species: Annual ryegrass
PLS: 70 percent
Desired seeding rate in mix: 10 pounds of PLS per acre
Seeding rate of bulk seed in mix: 10/0.70 = 14 pounds of bulk seed per acre
If seeding 10 acres of mixture from same box, mix approximately 190 pounds of crimson clover + 140 pounds of ryegrass and calibrate for 19 + 14 = 33 pounds per acre of bulk seed.
Calibration for MixturesSeed mixtures are becoming more popular with increased understanding of the complementarity of different species grown for forage or as a cover crop. Calibrating the drill for mixtures is no different from calibration of the drill for single species. As a first approximation, determine the seeding rate of each species in the mixture and divide the normal seeding rate of each species by the number of species mixed. So if, for example, you mix hairy vetch and rye and the normal seeding rate is 20 pounds per acre for hairy vetch and 2 bushels per acre for rye, you may plant 10 pounds per acre of hairy vetch and 1 bushel per acre of rye. To compose the mixture, determine how many acres to plant, weigh the amount of seed of each species, and mix thoroughly. If a two-species mixture is planted and each species can be seeded through a different box, you can calibrate each box for that species individually. If the seeds are mixed prior to calibration, calibrate using the guidelines for single species. Finding the first setting may be the most challenging. In many cases, mixtures will pack more densely, so start with the setting for seeding the species with the largest seed and then adjust accordingly. In the above example, you might start with the setting for 1 bushel per acre of rye.
Fine Tuning the CalibrationAfter calibrating the drill, you can keep track of the seeding rate after drilling a few acres. True seeding rate can be determined by one of several methods.
Most modern grain drills are equipped with an acre meter. Use it to monitor seeding rate. Keep track of the seed you have used and divide the amount of seed drilled by the acres planted. Alternatively, if an acre meter is not available on the drill and acreage is known for a given field, calculate the rate in a similar fashion. If a minor adjustment is needed, use the seed rate increments between settings to more accurately make the adjustment. Actual seeding rates may vary somewhat due to groundcover, soil conditions, overlapping between passes, and driving speed.
Drill Adjustment to Ensure Consistent Plant EstablishmentDepth should be checked several times, especially when beginning the planting operation until proper depth is achieved, and then periodically during seeding. When operating in no-till conditions, depth adjustments may need to be made as amounts of residues from previous crops change across the field. Be careful not to plant small-seeded species--particularly small-seeded legumes--too deep, especially during the spring, in cold soils. Seeding depth should be roughly 3.5 times seed diameter. Use no more down pressure on the drill and closing wheels than necessary to provide consistent seed-to-soil contact. Too much down pressure, especially in wet soils, provides a very poor environment for emerging seedlings. Pay particular attention to the drive wheel, if it is not also a transport wheel, to ensure that it continuously rides on the soil surface to ensure consistent seed metering.
Drill PerformanceMany drills with a small seed box have tubes that drop the seed behind the double disk openers, just before the press wheel. In some cases this may mean a significant portion of seed is not in close contact with the soil. Some farmers have found it beneficial to run a cultipacker through the field after drilling to increase seed-to-soil contact. Drill wear also needs to be taken into consideration when calibrating the drill. When changing the opening setting on older drills, not all openings may be affected in the same manner. If this becomes extreme, the drill may be in need of maintenance.
Field Crops
Dairy
Business
Livestock
Grains
Upcoming Events
WEBINAR - Automated Milking Systems Efficiency: Balancing Focus on Individual Cows and System Optimization
May 8, 2024
Please join Cornell the SWNY team and MSU Extension for our talk with Dr. Pablo Silva Boloña on improving efficiency of Automated milking systems by focusing on milking settings for individual and group success.
Broiler Field Day at Sunny Cove Farm
June 6, 2024
Alfred Station, NY
Join us for a field day to explore broiler production, processing, and finances. Meghan Snyder of Sunny Cove Farm will be our host. She raises small batches of organic broilers, processing them on-farm under the 1,000 bird exemption.
Stockmanship and Stewardship 2024
October 25, 2024
Hamburg, NY
Save the date!! The event is one of 4 across the US and is a two-day educational experience featuring low-stress cattle handling demonstrations, Beef Quality Assurance educational sessions, facility design sessions, and industry updates.
Announcements
No announcements at this time.